


Getting Started With Polymer Clay


Hello, this is Cory from Coryographies! If you don’t know me, I have an Etsy shop (www.coryographies.etsy.com) where I sell my handmade bookshelf necklaces and sushi jewellery, and a blog that follows my crafty adventures as well (www.coryographies.blogspot.com). I’ve been selling my jewellery for about a year, and have been working at it full time for around 4 months – so I still have lots to learn!
I’m really happy to be this week’s guest blogger at
Christmas Pie Crafts. I thought I’d
write about a topic I might be able to help people with, since I went through
it myself about a year ago – polymer clay and where to begin!
There are many types of polymer clay, and a LOT of
specialised equipment on the market to use with it, and you don’t need all of
it to get started. I want to share my
experiences with this really versatile and fun craft product, and help anyone
interested in starting to experiment with it themselves through this really
quick rough guide!
Polymer clay is a great medium for crafts, from creating
jewellery to dollhouse miniatures, to tiny pieces of sushi and book jewellery
like me :). We all played with
plasticine as kids, and this is where all those skills come in handy!
First off is choosing the right type of polymer clay Here are a few I’ve used:
- Fimo Classic is by far the firmest. It takes a lot of conditioning (mixing the clay to make it malleable), but if you want to make quite tiny pieces, it’s beneficial to have something that really holds its shape well.
- · Fimo Soft is often called good beginner’s clay. It is often available in starter packs with lots of colours, and it’s good if you’re working on pieces larger than, say... a walnut.
- · Premo is harder than Fimo Soft, and I like it because of its rubbery texture. It cuts well, and doesn’t crumble like Fimo Classic can.
- · Finally Studio by Sculpey is what I began with, but I found the texture really varied colour to colour, from chalky to mushy. I don’t really recommend it!


As far as cost, each little pack of polymer clay will probably be around £2. The cheapest place to buy your polymer clay is online, like on Ebay – shop around and you can get some good deals! Otherwise, it’s available in craft shops like Hobbycraft, and even stationery stores like W H Smith.
There’s so much equipment on the market for working with
polymer clay, and lots of it just isn’t necessary – you can probably get by
with just simple household equipment for your entire polymer clay toolbox! Here are some of the things that might come
in handy:
- · A polished marble or glass place mat (if you have one, instead of buying a special craft mat to work on) or, in a pinch, just use a dinner plate!
- · A sharpie marker – works great as a rolling pin, and the clay doesn’t stick to it! Try using the side of a mug as well to roll out larger bits of clay.
- · Toothpicks or needles – great for fine detail (also try the end of a paintbrush)
- · A pocket knife – I’ve stolen my husband’s Swiss Army knife, it works better than the scalpel-type cutting instruments you can buy!

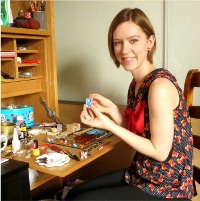
My workspace in my
bedroom - lots of household items used as tools for polymer clay!
When it comes to firing your beautiful finished product,
place it on an oven-safe plate or some card.
After it cools it hardens up a bit more, and the colour (if it changes
at all) is only a minor change (unless you’re using translucent clay). Remember it’s OK to refire polymer clay, so
you can build up a project in stages if you want things to not squish.
The next step is to varnish your creation to make it hard,
durable and shiny! I use Fimo’s own
brand of glossy varnish as it doesn’t smell bad and it dries quickly. I’ve used acrylic paint varnishes in the past
and they seem to work OK too. The best,
though, for strength and gloss, is definitely clear nail varnish! It holds
things together really well, and makes a hard shiny coating. It’s my best secret, shhh!
So what are you going to make first? YouTube is probably the best place to look
for ideas, and have some experienced hands guide you through. Try making animals, fruit, candies, flowers,
anything – you’ll get a lot better with it as you practise, I promise! Then purchase a few earring blanks or badge
backings and wear your creations for the world to see!

Thanks very much to Jill for inviting me to share this post
with you!
Twitter: @coryographies
www.facebook.com/coryographies
coryographies.blogspot.com
Twitter: @coryographies
www.facebook.com/coryographies
coryographies.blogspot.com


A nice introduction Cory. I really liked seeing the picture of your workspace- far far more organised than mine!
ReplyDeleteA fascinating read Cory, really enjoyed thank you Jill for bringing all these interesting crafters to us.
ReplyDeleteThanks for all those tips. I agree that you don't need lots of expensive items to get started.
ReplyDeleteI love your work Cory and was very interested to hear what varnish you use as one I used (can't remember what it was) wouldn't dry fully and remained sticky. I was a bit put off by this so haven't done anything for a while.
ReplyDeleteWow! such intricate work! I am impressed!
ReplyDeleteThis looks like fun! And easy to get started too.
ReplyDeleteLesley x.